Manvis stands for Manual-Visibility, and it is a tool developed to better manage visibility and optimize framerate in your Medal of Honor scenes. It’s also known as using vis_leafgroups, which is the name of the entity type involved in the process. Many of the scenes in the original Medal of Honor: Allied Assault were very large and detailed, most especially some of the outdoor destroyed city scenes, etc… A lot of the blown-out shells of buildings had too many holes (windows, doorways, damage, etc…) to effectively block visibility. More conventional tools like hint brushes were not appropriate to use in this context, so in order to get the scenery to run effectively, Manvis was developed. It is one of several tools that can be used by a level designer to optimize framerate. By no means should it be used in every level, so the purpose of this tutorial is to illustrate the proper use of Manvis.
If you have an indoor level that is efficiently built for visibility (i.e. – good use of structure brushes to block lines of sight) and it has a good framerate, then Manvis may not be worth the time it takes to setup and tweak properly. Other tools exist, like hint brushes, that are better suited for optimizing framerate in indoor scenes. If, however, you have larger areas (indoor or outdoor) with long lines of sight, lots of detail, static entity, and/or terrain geometry, and your framerate starts to chug in these areas, then Manvis may make more sense. In an area like this, hint brushes would not be useful as there is very little to no structural brushes to build onto. Depending on the circumstances in which you use it, it will get you at least a 5% increase in framerate but sometimes more (even in well-structured interiors). In essence, what you are doing is taking a load off the CPU’s visibility calculations at runtime by predetermining it yourself. The system isn’t as tied up with calculating what portions of your scene are visible from your position dozens of times per second, it references this information stored in memory instead for quicker access.
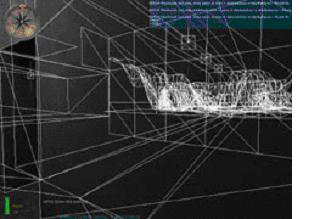
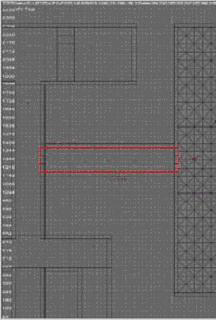
Now, it would be entirely possible to address this premature popping of the outdoor terrain when you are in the corridors using hint brushes in your scene. But this would only help you when you are inside the corridors looking out at the terrain. What happens when you go outside and look at the terrain in wireframe, as shown in the screenshots below?
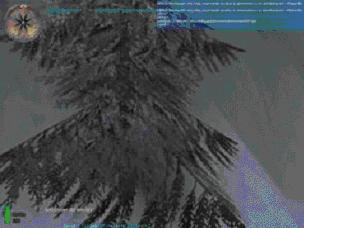
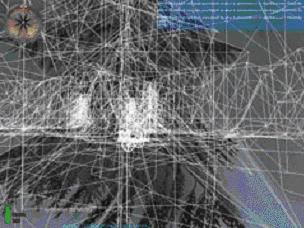
As you can see, the engine is drawing all the trees and static geometry behind the hill, but this is more than is visible to the player. And since this is in a larger outdoor area, hint brushes can’t help you here.
This is where Manvis can be of the most benefit.
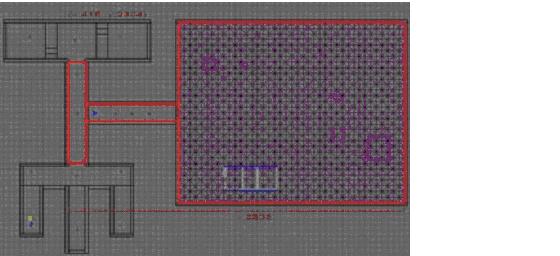
Manvis is implemented in a scene by placing brushes using the VIS texture, and then binding these brushes to vis_leafgroup entities, followed by making connections between the various brushes. The following instructions will walk you through how to implement Manvis in this tutorial scene:


Figure 1
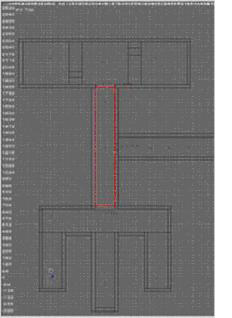 Figure 2
When you make a connection from brush A to brush B, essentially it’s like saying “From A, you cannot see B”. Save the mapfile, then do a full compile and run the scene. Now, when you are inside the vis brush in the first corridor, you can’t see the contents of the outdoor room. Likewise, when you are in the outdoor room, you can’t see the contents of the first corridor. Make sure you have “r_showtris 2” typed in so you can see exactly how much the engine is rendering.
Although Manvis can be useful tool, it requires very thorough and careful planning to use, and can be time-consuming to tweak. When you ran the scene, you probably noticed that when you moved into the second Manvis brush from the first, the contents of the outdoor room appeared suddenly. This is an example of a “popper” – an area that is being clipped out from the view frustrum prematurely or incorrectly due to a connection between Manvis brushes.
The main cause for this is that the brushes we placed in the example above were too general for the shape of the rooms. This was intentional, as a simple example was needed to demonstrate how to use Manvis in a basic case. There’s really no set rules on what the size and shape of your Manvis brushes needs to be – it’s totally contextual in regards to the shape of your level’s structure and what areas the player can traverse. Place too many small brushes and it will take a very long time to setup and maintain. Make your brushes too large, and you may be rendering (or clipping out) more than you need to at a given point. Sometimes it’s useful to make them the same shape and size for consistency, while some of the Allied Assault maps had very large brushes that overlapped. Take a look at some of the MOH – Spearhead maps that shipped with the SDK (t2l1.map and MP_Berlin_TOW.map) and see how Manvis was implemented.
Let’s go back into Radiant and load up manvis_tutorial2.map. This version is identical except that the Manvis brushes we placed before have been divided up and sized into shapes that are a little better suited for the context of the level. If you click on the Manvis brushes in Radiant you’ll see that there are now connections between them. Run the scene and type in the “r_showtris 2” console command and watch how different parts of the scene clip in and out as you walk. Looks a little more efficient, doesn’t it? Although the performance savings in a small, quickly put together tutorial like this are fairly negligible, in a larger outdoor scene with more carefully planned brushes, the savings could be much greater.
Now, it’s your turn. Load up manvis_tutorial1.map, then go to File->LoadPrefab and select manvis_tutorialgroup1.pfb. This will load in the Manvis brushes from manvis_tutorial2 into the current scene, but without all the connections. For each manvis brush in the scene, you’ll need to determine what is potentially visible from that brush. This is harder than it sounds, the engine’s field of view from a given point is farther and wider than you might think, and often, the only way to properly tweak it is to compile the map, run it, and look for “poppers,” then come back into Radiant and re-size brushes and change connections. Try this process out yourself. Click on a manvis brush and think about what other manvis brushes you can and can’t see from where you can go inside that brush, and make suitable connections. Reference the manvis_tutorial2.map as needed.
If you need to make a disconnection between brushes (to make a manvis visible from another brushes), simply hold down shift as you select the pair, then hit CTRL-ALT-K.
Ideally, the best time to implement MANVIS is after you have established the “footprint” of the level and layed out the critical gameplay areas with structural brushes. Then, make sure that if you have to add in brushes, that you only do so by using the clip tool to splitting existing ones. The reason for this is that if you add a completely new brush or clone an existing one after you’ve made your connections, you’ll need to update all the other brushes in your scene with a connection to the new one. In contrast, if Brush A has a connection to Brush B, and Brush B is split, Brush A will have connections to both brushes created by B’s split. You can always remove brushes without worry, but be careful before adding a new brush, see if you can simply resize or split an existing one to get what you need.
If you have a lot of doorways in your scene that block visibility or use area portals, it’s wise to do your manvis before you add these doors, or assume that they are going to be open. This will do a lot to save you time tweaking and retooling your manvis brushes in your scene. The same thing applies to exploding chunks of walls or objects –any brush-based entity that forms part of a wall may obscure a player’s line of sight but will not block the visibility, and you should assume that the brush isn’t there when you’re figuring out Manvis.
Another good habit when you are trying to track down popper bugs is to run your scene in a window (hold down ALT-Enter to toggle between windowed and full-screen mode) and leave Radiant open while you are walking around your scene – that way you can tweak your Manvis brushes while looking at your scene in real-time. Also, when looking for poppers in your scene – consider all the possible ways that people could enter and exit your brushes (backpedaling, strafing, jumping from a higher area, crouching, etc…) as this will increase the likelihood that you’ll catch all your manvis errors.
A quick note on this Manvis and BSP Leaks – since Manvis brushes are entities they shouldn’t touch the void. They can penetrate and encompass structural brushes, but anything more than that and you’ll get leaks.
Vis_Derived is an option you set in your worldspawn properties (in MohRadiant, simply click on any non-entity brush and hit “n” to bring up the entity window). By default, this key is not present, implying a default value of vis_derived of 0. What a value of 0 means is that when your map’s visibility is being compiled, it takes into account both the data from your Manvis brushes as well as the visibility data generated by structural brushes in your scene when determining what’s visible from where. When you add the “vis_derived” key and set it’s value to 1, it will use the Manvis data exclusively and will ignore your structural brushes’ influence on visibility, resulting in faster vis compile times (theoretically). For most cases you will want to leave it at 0.